Been working on my second shot mostly today. Adjusted the animation as well as the collision. Imported everything back into Maya and did the adjustments. Added debris in maya as well using particle instancing, with the help of Sun ShiYi's script he let me use! Great help as there isn't much time left till submission.
So here's what I have so far. Further refinements to come..
Sunday, September 16, 2012
Friday, September 14, 2012
Update to the first shot
Managed to get the desired looked for my crack on the ground in the first shot. Here's what I have so far. Brought in my match-moved camera from Maya as an FBX and matched the road in Houdini accordingly.
But the only question now is, how to texture in Houdini?!?!
But the only question now is, how to texture in Houdini?!?!
Wednesday, September 12, 2012
Effects Update
Alright so I've been hard at work trying to figure out how the hell am I going to get all my effects done by next week.
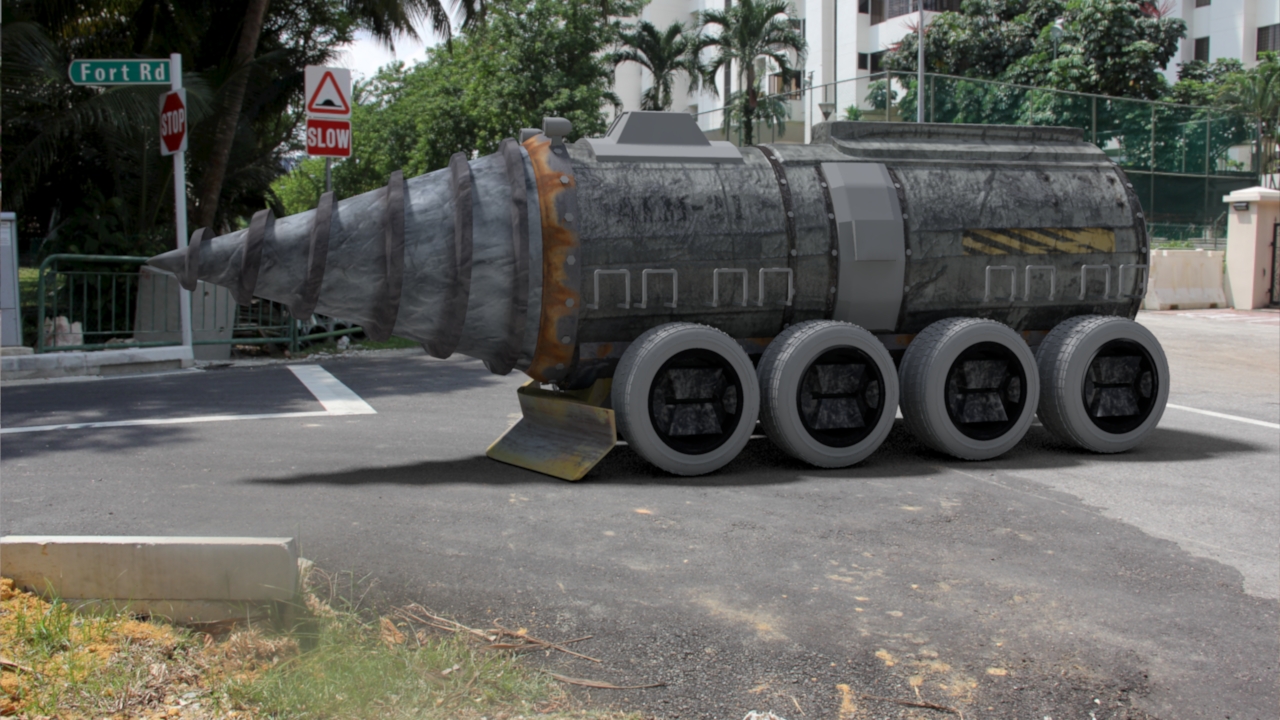
So after a lot of thinking, I managed to sort things out. So what I intend to do is, render my drill in maya with the textures, lighting and animation, and then comp in the effects I produce from Houdini.
Here is the latest of the effects of the second shot of my project will probably look like.
What I did was export the camera out first from Maya to Houdini using the FBX format. I then created a low poly mesh of my vehicle and attached it to my high-res vehicle's rig, that way, if I animate the high res, the low res poly follows exactly.
After that, I animated my vehicle in Maya, then used a plug-in I found online to help me export the low-res poly (with the animation) into houdini as an OBJ file. Once that was done, I built my ground in houidni, voronoi-ed it, and made the drill interact with only the areas I wanted it to.
Now my only problem right now is, I want the area where its suppose to crack not to drop down as fast. I tried animating my grouped points in houdini to become active at a certain frame, but it didn't turn out as I had planned. Then I tried using attributeTransfer and animating the distance threshold, but sadly, it didn't work as great for me. So for now, I will stick with this and refine further.
Now all I gotta do is texture the ground reference my backplate for accuracy of placement. Oh boy.
Monday, September 10, 2012
Updates
Wow, the deadline is in a few weeks! Ahhh the pressure. Well got to get on with it!
So my latest updates are with texturing, HDRI adjusting, as well as some effects pre-viz.
I tweaked my HDRI to be a bit warmer in order to match my shot a bit better, and as you can see, there is a difference in the lighting of the vehicle.
Added a few more textures, mainly to the drill and the wheels. Aiming to get the rest done before the end of this week.

Tyson came in last Saturday and he gave some valuable feedback. He mentioned that the HDRI will work this this shot, but of course to improve my textures and get it to be more dirty. After all, the vehicle is coming out of the ground!
Lastly, did some tests in class with houdini to get the effect I want for the drill coming out of the ground. Here's what I have so far.
Still so much to do, and so little time left. *gulp*. time to shift into hyper gear and burn midnight oil!
So my latest updates are with texturing, HDRI adjusting, as well as some effects pre-viz.
I tweaked my HDRI to be a bit warmer in order to match my shot a bit better, and as you can see, there is a difference in the lighting of the vehicle.
Added a few more textures, mainly to the drill and the wheels. Aiming to get the rest done before the end of this week.
Tyson came in last Saturday and he gave some valuable feedback. He mentioned that the HDRI will work this this shot, but of course to improve my textures and get it to be more dirty. After all, the vehicle is coming out of the ground!
Lastly, did some tests in class with houdini to get the effect I want for the drill coming out of the ground. Here's what I have so far.
Still so much to do, and so little time left. *gulp*. time to shift into hyper gear and burn midnight oil!
Tuesday, September 4, 2012
Updates to texturing
I've been texturing the vehicle now and aim to finish in a week's time. I thought I would use Mudbox to texture, but I think the traditional way of using Photoshop is better for now. Here's what I've got so far.


I do think that the front plate texture looks slighty off, but this is just the first draft. I'll refine it more by my next post!
Friday, August 31, 2012
Roughcut
Got my rough cut out. I managed to track the first shot (thanks to Ron for some help with that). What I thought was impossible, was possible! So in the rough cut, I have the ground cracking up in the first shot, the drill vehicle coming out of the ground in the second shot, and finally it speeds off with smoke coming out of its booster in the last shot.
Thursday, August 30, 2012
Drill Rig
After a gruesome night of work, I've got the rig done for my drill. I managed to get the controls for the rig for most of the things I want to show in the animation. Hopefully it's accurate enough to look believable. Now to animate and input this into my rough cut!
UV Layouts!
Sorry for the extremely late update! Been busy doing the JUMP test and assignments from class.. and of course working on the final project!
So in class yesterday we submitted out pre-viz and footage that we shot for our project.. And tomorrow we have to submit our rough cut so Thibault can have a brief look at what we're trying to achieve at the end of the course. I'm pretty excited he's coming down this week, and at the same time I wanna prepare some effects stuff to show him so I can get his opinion on it as well!
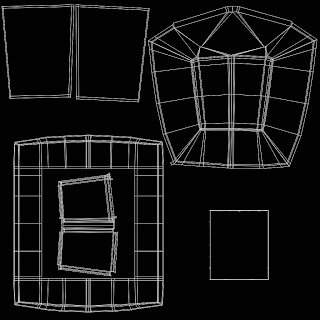
As for what I've been up to lately, I really had trouble with my drill model after taking a closer look at it. I realized there was A LOT of clean up to be done. To start off, a hell load of double faces. And a lot of vertices were all over the place. So after a lot of work, I've finally managed alter the look of the drill, as well as finish the UV layouts for it. Here are the final images of the layouts and my model with a checkered board on it.


I've actually already rigged my vehicle, but I think I need to redo it to get it looking the right way in the animation. So i'll be working on that for now, and hopefully I'll get the rough cut out by tmr!
So in class yesterday we submitted out pre-viz and footage that we shot for our project.. And tomorrow we have to submit our rough cut so Thibault can have a brief look at what we're trying to achieve at the end of the course. I'm pretty excited he's coming down this week, and at the same time I wanna prepare some effects stuff to show him so I can get his opinion on it as well!
As for what I've been up to lately, I really had trouble with my drill model after taking a closer look at it. I realized there was A LOT of clean up to be done. To start off, a hell load of double faces. And a lot of vertices were all over the place. So after a lot of work, I've finally managed alter the look of the drill, as well as finish the UV layouts for it. Here are the final images of the layouts and my model with a checkered board on it.


Body UV

Booster UV

Bottom Plate UV (below body)

Cockpit UV

Door UV

Drill Head UV

Handle UV

Headlight UV

Shovel UV

Tire Thread UV

Wheel UV

Blade & Booster Nosel UV

Suspension UV
I've actually already rigged my vehicle, but I think I need to redo it to get it looking the right way in the animation. So i'll be working on that for now, and hopefully I'll get the rough cut out by tmr!
Thursday, August 9, 2012
Updates on Lighting
Did some cleaning up on my model. I realized that I had a few duplicated pieces on it and it was all so confusing when I tried selecting parts of the vehicle. I set up my lighting with my CG model in it, and here is the result, and another with the chrome ball.

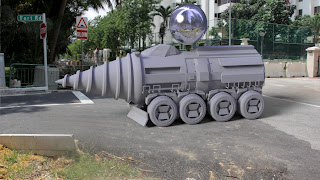
For now, I just have one directional light pointing down on it to get a feel of the lighting and shadows. Still working on a bit of the modeling before I can start proceeding on with UV layouts. I'm aiming for that by tonight and hopefully by my next post!


For now, I just have one directional light pointing down on it to get a feel of the lighting and shadows. Still working on a bit of the modeling before I can start proceeding on with UV layouts. I'm aiming for that by tonight and hopefully by my next post!
Sunday, July 29, 2012
Shooting
I finally managed to do my first shoot today. Used a chrome ball for the environment lighting, 2 angles. I think my second angle isn't as good as the first though.
.jpeg)
.jpeg)
After that went into Nuke and adjusted both to get my final output for my HDRI. One for the Environment Map, and one for Final Gather.


.jpeg)
.jpeg)
After that went into Nuke and adjusted both to get my final output for my HDRI. One for the Environment Map, and one for Final Gather.


And so I shall try applying these to my video shoot that I took earlier, but for now, i'll upload a few stills so you can get an idea of where I'm shooting.


Next up, integrating everything together, as well as effects for my drill!
Friday, July 13, 2012
Modelling Update
Here's what I've got so far. I want to call it done, but I know I can furthur improve it by adding more details. I changed it a bit from the previous picture I uploaded too. But for now, I am happy with it, and will continue on with the rigging and animating!


Friday, July 6, 2012
Modeling
Accoring to my production schedule, I should be on modeling from now till next week. And that's exactly what I've been doing!
So here's what i've managed to accomplish so far:

This is excluding the booster I want to add, as well as further detail to the body of the vehicle. After this, its rigging, then i should be good to go to proceed on to animating this into my scene!
More to come soon!
So here's what i've managed to accomplish so far:

This is excluding the booster I want to add, as well as further detail to the body of the vehicle. After this, its rigging, then i should be good to go to proceed on to animating this into my scene!
More to come soon!
Wednesday, July 4, 2012
Effect Reference
So I found some really good reference for my shot. Basically what this video shows exactly what I've been thinking to accomplish.
I like the interior detail and how gradually the drill comes out of the ground. Now to try to get that effect for myself!
I like the interior detail and how gradually the drill comes out of the ground. Now to try to get that effect for myself!
Monday, July 2, 2012
Storyboard, Production Schedule, Shotsheet, & Animatics
It's been a very busy weekend for me! So I managed to get the storyboards, production schedule, shotsheet, and even the animatics done for the project. Here it is!
Storyboard:

Prodution Schedule:

Shotsheet:

Animatics:
And there you have it! If you cant see the production schedule and shotsheet clearer, i'll try to upload the actual files on here.
Now the real work begins... *dramatic music plays* dum dum DUMMMMMM!!! lol.
Storyboard:

Prodution Schedule:


Animatics:
And there you have it! If you cant see the production schedule and shotsheet clearer, i'll try to upload the actual files on here.
Now the real work begins... *dramatic music plays* dum dum DUMMMMMM!!! lol.
Sunday, July 1, 2012
New Idea
Alright so after class today, i realized that despite liking my idea, doing an organic animated character shot would be a little out of my reach in the short amount of time left to submit the final project, the main obstacle being the subsurface scattering and animating/modelling of the character.
So instead, i've thought of another brilliant idea! I'll have a drill-like machine coming out from the ground and speed off after reaching the surface.


These are just a few concepts of the vehicle. Havent decided whether im gonna do one with wheels like in the first pic, or like the last, or no wheels at all! but i'll do something simple for the animatics just to lay out the idea.
And it'll be drilling from beneath the surface and as soon as it reaches the top, my idea is that it will have some sort of a booster which it fires up and zooms off.
Here's a reference video i found on youtube which has the basic concept of what i would like to acheive.
So yeah, im excited about this idea. woohoo! lol. alright, now to jot down the storyboarding and start on the animatics.. till the next time!
Friday, June 29, 2012
First post
So i've been doing alot of brianstorming over the past few weeks as to what shots I should do for my final project. I've been getting plenty of feedback from family, friends, and teachers.
I'm gonna list down what I've narrowed it down to.
1. Building expolsion
A simple scene of a beautiful looking building in the distance getting attacked by multiple metallic-looking objects (I havent decided what these are yet), forcing its way through the building, causing mass destruction along the streets of it.
2. Big beast
What I had in mind for this is that a character either summons a beast, or the beast appears on its own, but its entrance is where the money shot lies. The beast will be breaking through the ground as if it was from an underground dungeon of some sort, and slams its arms onto the pavement of the ground with a loud roar.
3. Road shatter
So this would be one of my first ideas I thought of. A meteor of some sort heading straight for a city, which results in an explosion. The main shot would be of the road shattering up to the point of the boot of a car or the front view of the camera.
After consulting my amazing teachers in class today, I was given the best advice anyone's given me lately, do something that I WANT to do, and not for the sake of doing it. I believe doing something that I really want to do can really drive me and push me even further in what I want to achieve(Thanks Thibault).
And so I really like my second idea, althought im not entire sure of how everything is gonna be put together, but I have a jist of how it can be done. It's a challenge to me as well, animating the beast along with the destruction that I want to include. My main focus for the project will be on effects, but I still hope to involve lighting and comping as much as I do effects.
I'll get story boards up soon enough of how I intend to do it all, but for now I need to hunt for a decent enough model for the beast. As of now I've found a few decent one, but also a few transformer-related ones lol. Have a look!


These are just a few I found decent-looking. But i'll eventually hunt for more tomorrow :).
Alright I think that's all for now. Hopefully by the next post i'll get my storyboards up!
Wednesday, June 27, 2012
Subscribe to:
Posts (Atom)